

On special request I made you a stick horse tutorial. If you like to read more about these horses, just go here, here and here.
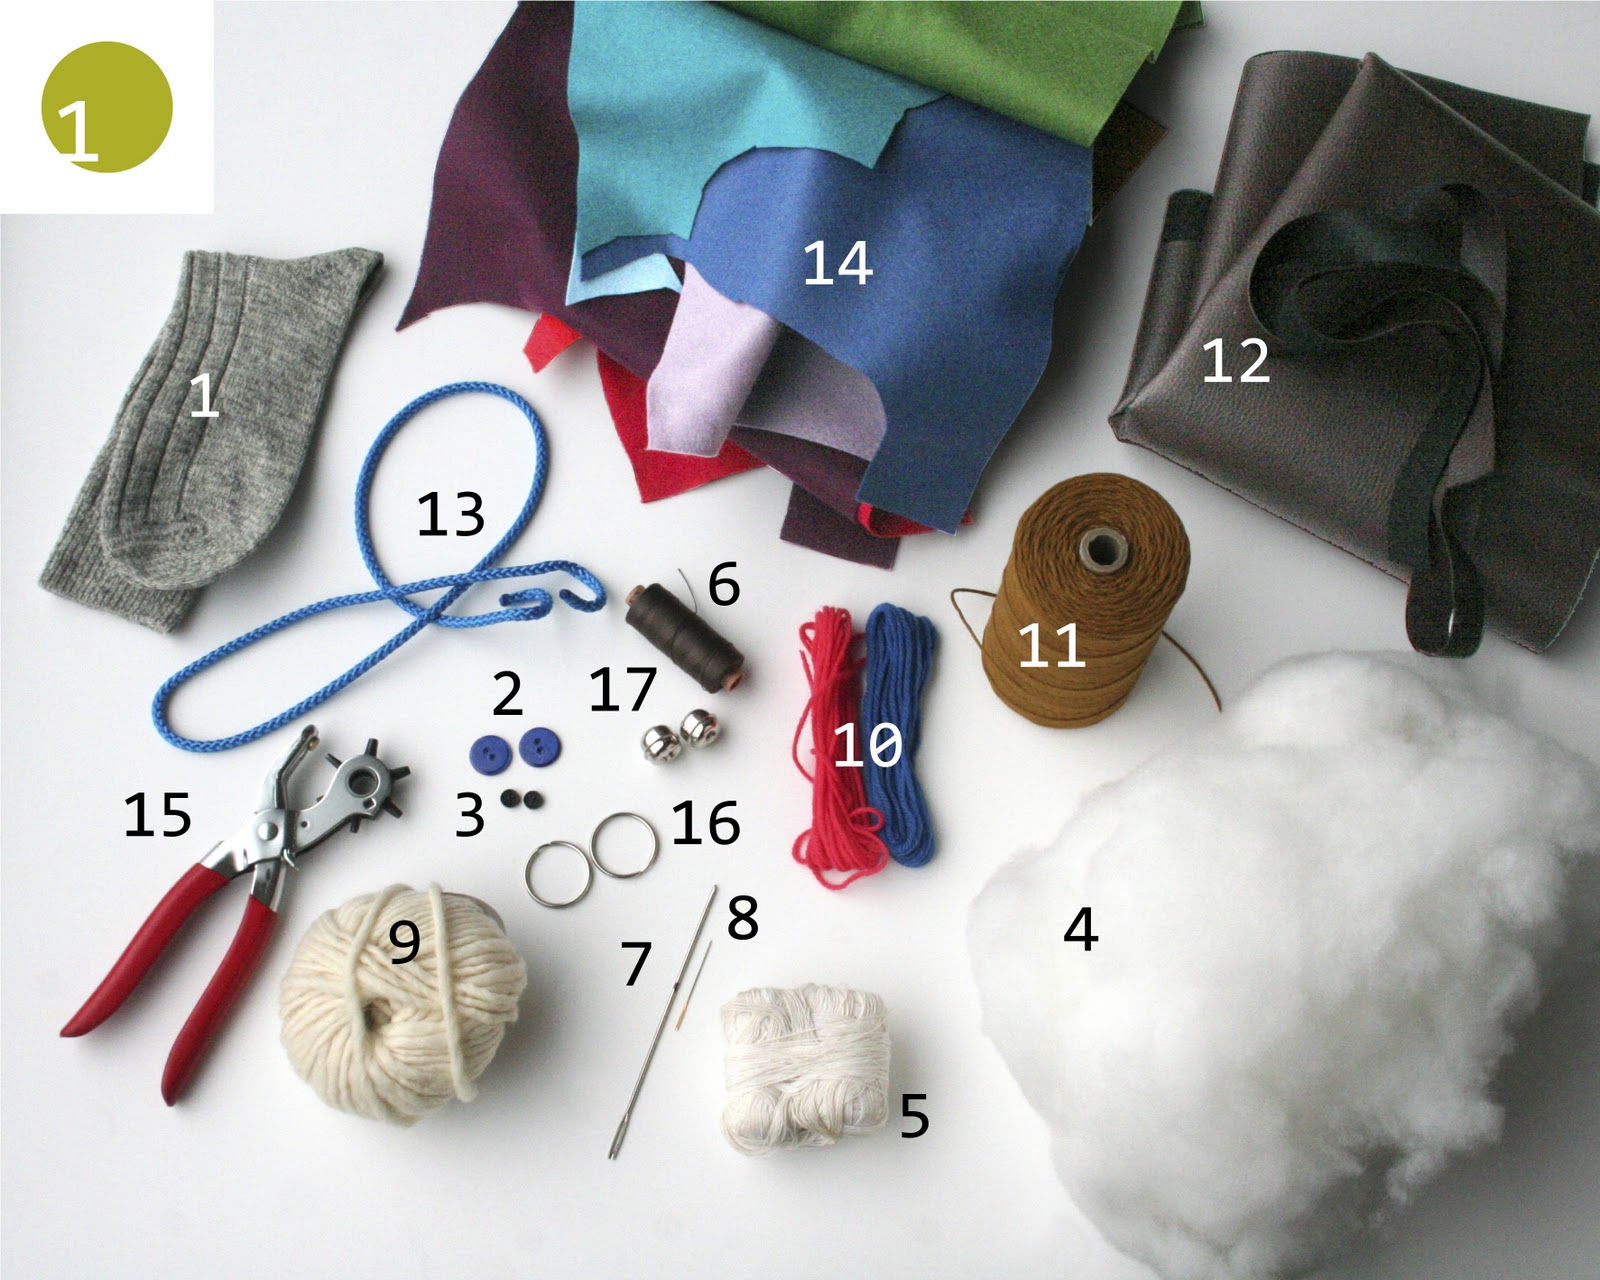
This is what you need to make one of them:
- (old) sock, big mensize
- 2 buttons in a bright color
- 2 small (black) buttons
- quite a lot polyether stuffing
- strong white thread
- strong dark thread
- extra long needle
- normal needle
- thick woolen yarn for the manes
- leftover wool to embroider
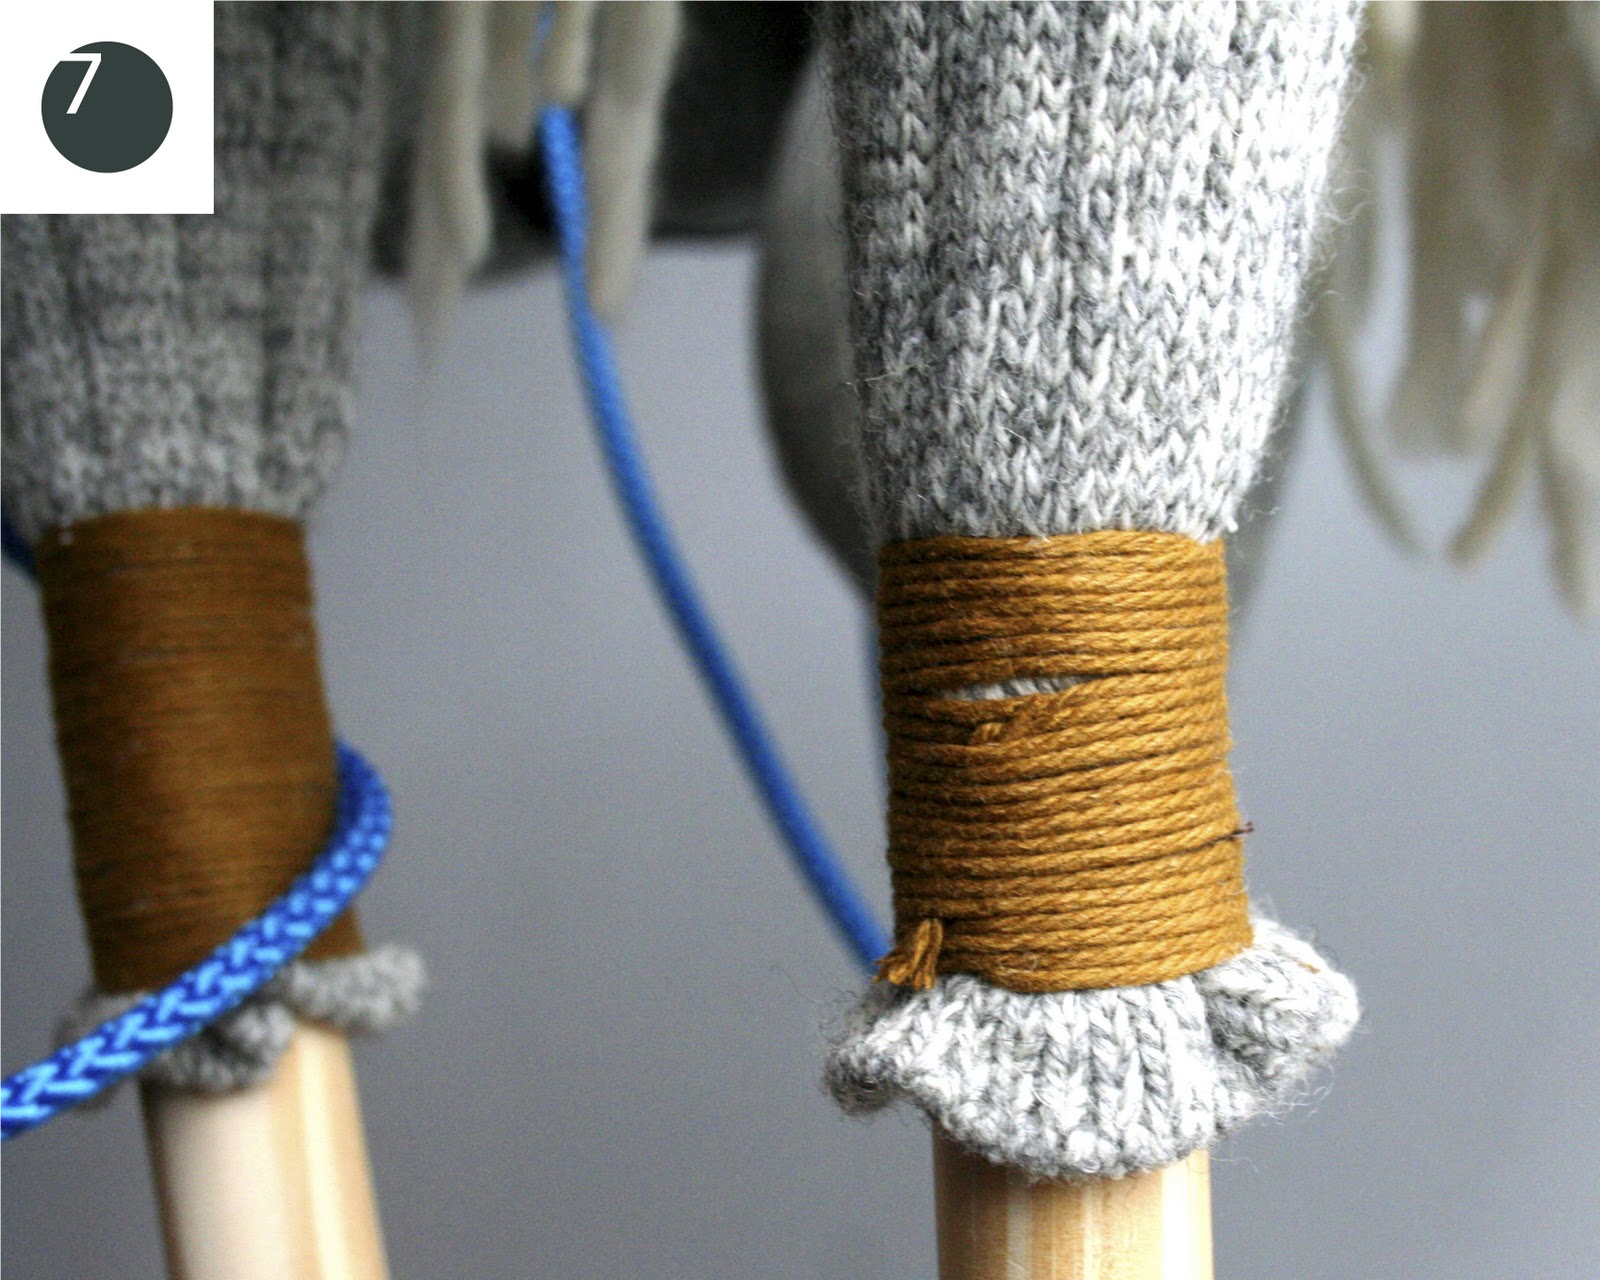
- cotton rope to secure the sock to the stick
- piece of (imitation) leather or about 1 meter of leather strip 2,5 cm wide
- about 1 meter of thick natural or polyester rope for the rein
- felt for the ears
- punch to make holes in the leather strip
- 2 key rings diameter 3,5 cm
- 2 bells
- (old) broomstick (not pictured).
Fill the sock with stuffing.
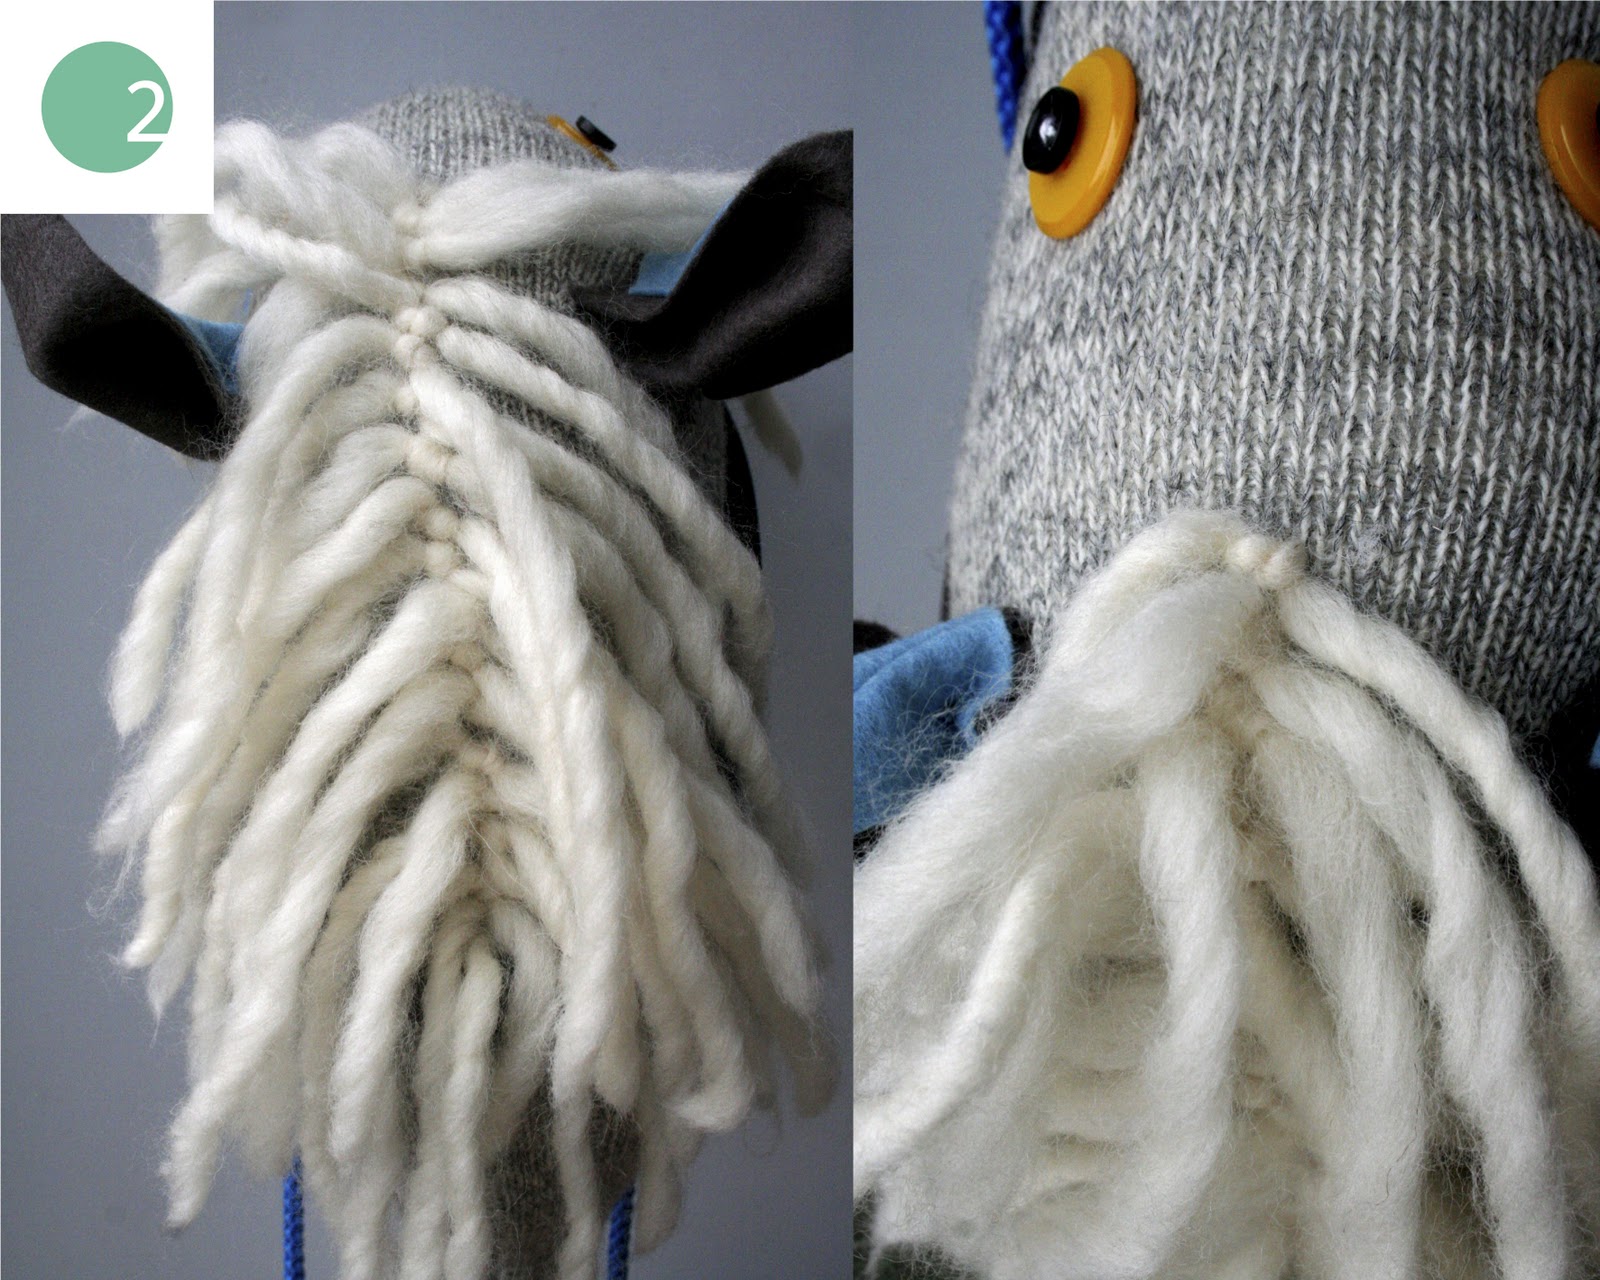
Attach the manes, starting from the heel of the sock, down to the opening for about 15 cm. Tie up with double knots. Be sure to attach the manes in a row close to each other.
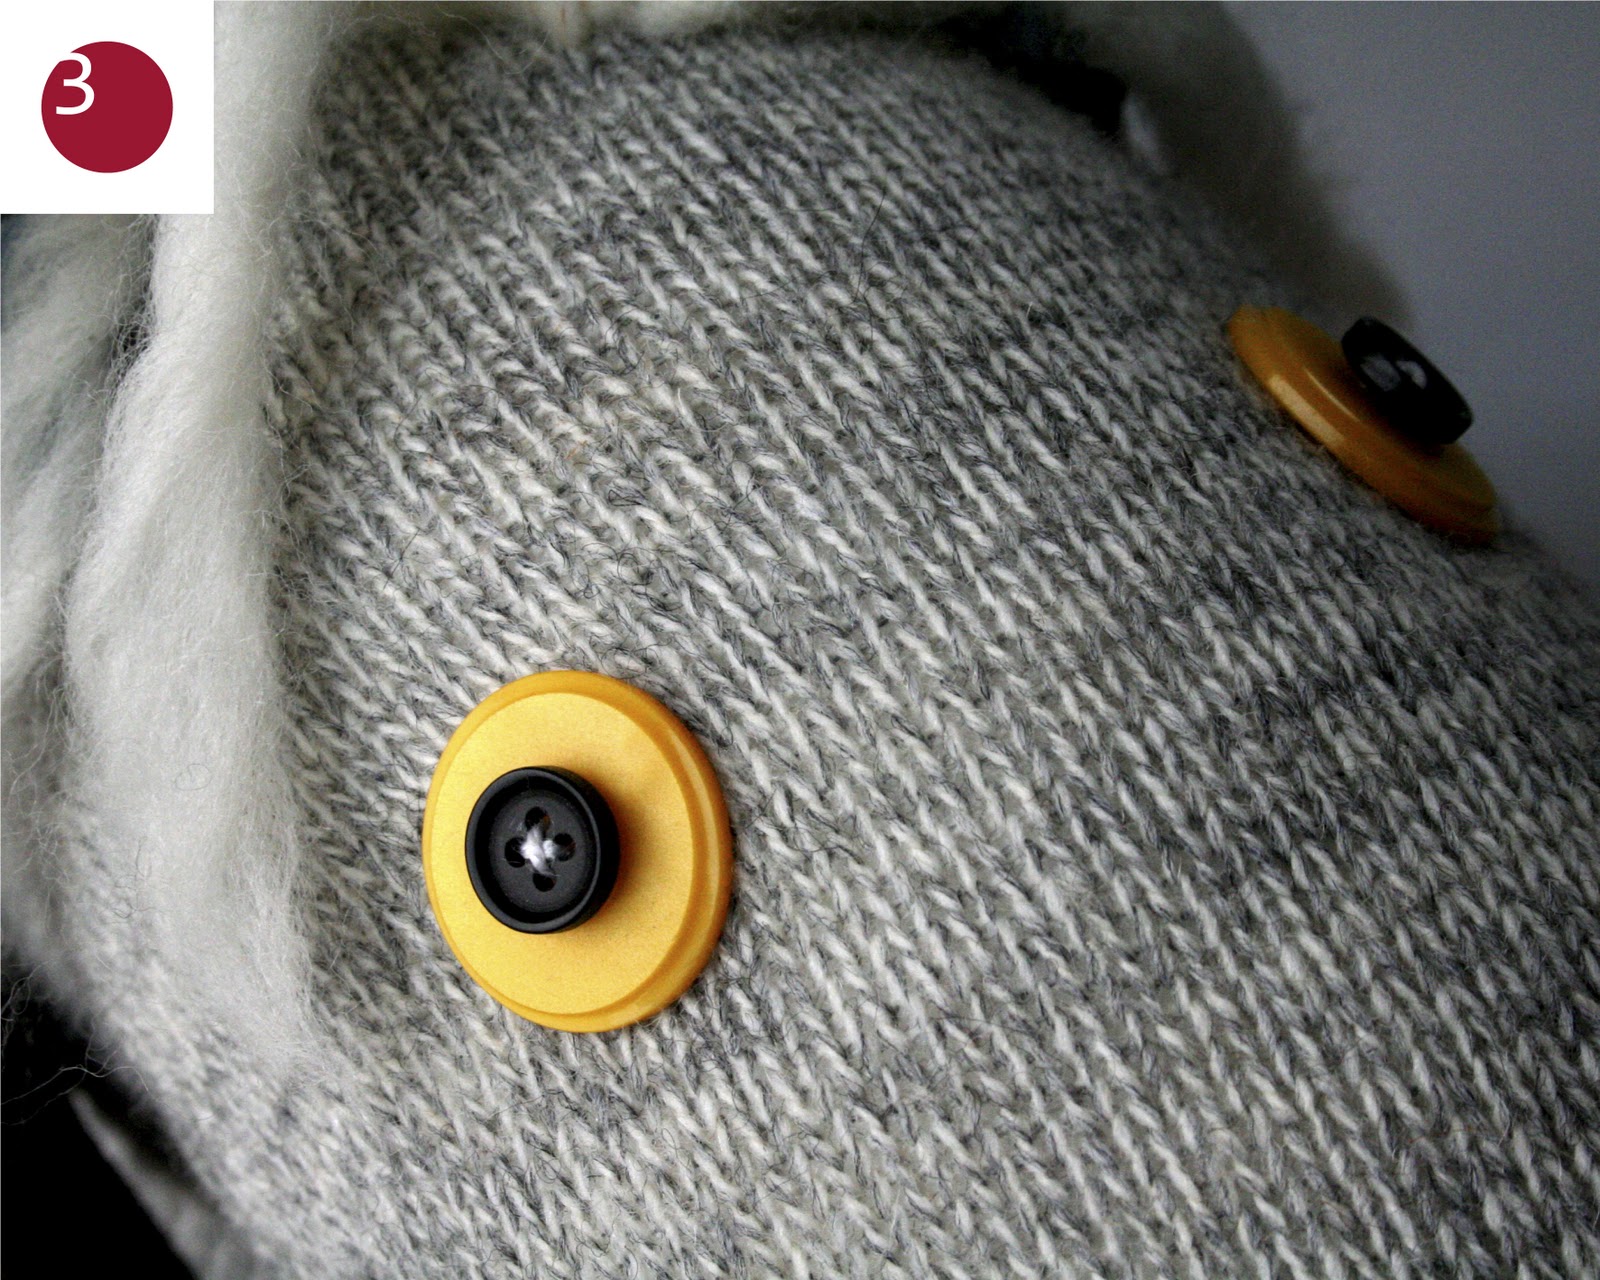
Attach the eyes, take care to attach them symmetrically. Take a long and strong white doubled thread, make a knot and start on the spot of eye 1. Go with the long needle to the other side, attach with a normal needle a colored button and a small button on top (eye 2) and go backwards to the knot. Attach eye 1 the same way and go back. Attach eye 2 for a second time and go back. Attach eye 1 for a second time, finishing with a knot under the button. Cut.
Make the mouth. Take a long and strong dark doubled thread. Go with your long needle right through the sock, go again in the same direction through the sock on the same spot, then again for a third time. Pull for shaping a mouth and make a secure knot. When finished just rotate the thread in order to vanish the knot from sight. The knot is now into the sock. Pull the mouth a bit down to get a better result.

Cut quarter circles of felt, taking two colors and two different diameters, in my case 18 and 14 cm. Fold and stitch across to shape an ear. Attach the ears to the sock, be sure to do this symmetrically.

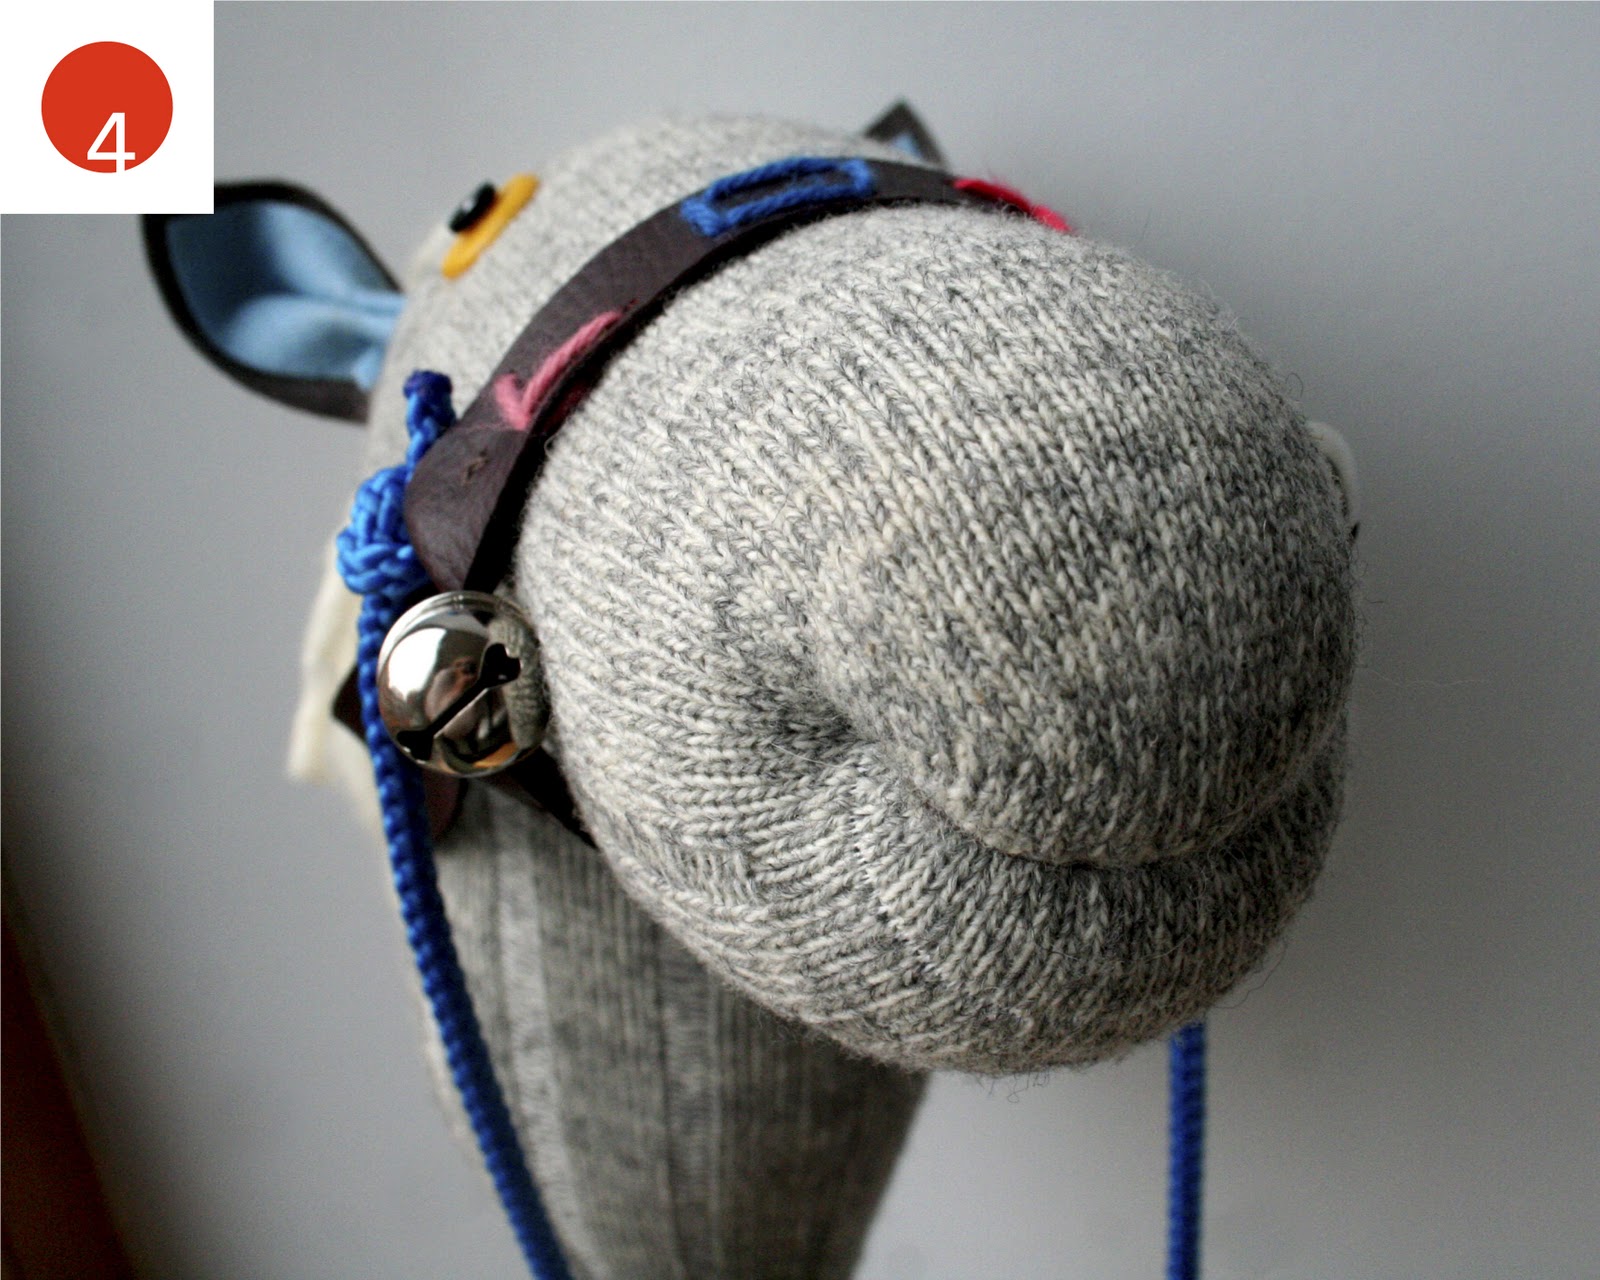
Cut with a metal ruler a leather strip of 2,5 cm wide, 1 meter long. Hold the key rings on both sides of the head and measure the length needed for the top strip, which is about as long as the under strip. Cut top and under strip 5 cm longer than measured. If you like to, you can punch holes in the top strip to embroider a name afterwards. Attach bells to the key rings. Attach top and under strip to the key rings, by sewing a cross with the strong dark doubled thread. Put it on. Measure from one key ring, down to the lower side of the manes, back to the other key ring. Cut a third strip 5 cm longer than measured (in my case 50 cm). Attach this strip the same way to the key rings and under the lower side of the manes. The manes will hang over this attachment. Attach rein to the bridle.
Call your child!
This tutorial is for personal use only and may not to be used commercially.

413 comments:
«Oldest ‹Older 401 – 413 of 413A customised gold ring is a timeless expression of love, perfect for celebrating special moments. Whether you’re looking for customised couple rings to symbolize your bond, elegant men’s engagement rings, or classic gold engagement rings, personalized designs add a unique touch. Crafted with precision, these rings can feature engraved initials, meaningful dates, or unique patterns to reflect your love story. From sleek modern styles to traditional designs, a customized ring ensures exclusivity and elegance. Celebrate love and commitment with a beautifully designed gold ring that represents your journey, making every moment even more special and unforgettable.
Finding the perfect gift can be challenging, but with thoughtful options, you can make any occasion special. Whether you're searching for Valentine's gifts for her, Valentine's Day gifts for your girlfriend, or unique birthday gifts for women, there’s something for everyone. From elegant jewelry and personalized keepsakes to luxurious spa sets and romantic experiences, the right gift reflects love and care. Consider timeless classics like a handwritten letter paired with a chic accessory or a surprise dinner plan to create lasting memories. Show her how much she means to you with a gift that speaks straight to her heart.
Looking for the best confectionery wholesalers in UK? We offer a wide range of sweets, chocolates, and treats at unbeatable prices. As cheap confectionery wholesalers, we provide bulk deals perfect for retailers, events, and businesses. Our selection includes top brands and classic favorites, ensuring quality and variety. Partner with trusted wholesale confectionery suppliers UK for fast delivery and great discounts. Whether you need chocolates, toffees, or gummies, our wholesale confectionery UK collection has everything you need. Stock up today and enjoy high-quality confectionery at the best prices. Shop now and satisfy your customers with delicious treats!
Looking for bulk wholesale sweets clearance deals? Get the best prices on a variety of confectionery from trusted wholesale sweet suppliers UK. Whether you need sweets for events, businesses, or personal use, we offer a wide range of delicious treats at unbeatable prices. Shop sweets in bulk cheap UK and enjoy cost-effective options without compromising on quality. From chocolates to classic candies, find everything you need in one place. Take advantage of our wholesale discounts and stock up on your favorite sweets today. Order now and satisfy your sweet cravings with our top-quality wholesale sweets!
Looking for the Best wired mouse for laptop? A high-quality wired mouse offers precision, durability, and seamless performance. Whether you're a gamer or a professional, choosing the best mouse for laptop wired ensures smooth navigation and fast response times. A wired mouse for laptop eliminates connectivity issues, providing a stable connection for uninterrupted work or play. If you're searching for a mouse for laptop wired, opt for an ergonomic design with a comfortable grip for extended use. Upgrade your computing experience with a reliable wired mouse that enhances productivity and efficiency without lag or delays.
Finding a reliable manufacturer of diesel generators is crucial for ensuring uninterrupted power supply. Leading diesel genset manufacturers provide high-performance generators designed for industrial, commercial, and residential use. These generators are built to deliver efficiency, durability, and low fuel consumption, making them a cost-effective choice. Top industrial generator manufacturers offer a range of power solutions, catering to different energy demands. Whether you need a backup power source for a factory, hospital, or construction site, choosing a trusted generator manufacturer ensures long-lasting performance. Investing in a high-quality diesel genset guarantees reliability, reduced maintenance costs, and superior power output.
Looking for the best silent generator for home? A silent diesel generator for sale is the perfect solution for uninterrupted power without noise. These generators offer efficient performance, fuel savings, and low maintenance. Whether for home or business, a DG silent generator price varies based on capacity and features. Investing in a silent generator ensures smooth operation during power cuts. Choose from top brands offering advanced technology and reliability. With multiple options available, compare models to find the ideal generator that fits your budget and needs. Get a high-quality silent generator today for a seamless power backup experience!
Looking for reliable power backup solutions? Check out the best options for diesel generators to meet your needs. If you’re interested in affordability and efficiency, explore the 10kVA diesel generator price, offering dependable performance for small to medium operations. For quieter environments, the 10kVA silent DG set price ensures low-noise functionality without compromising on power. Larger setups can benefit from the 15kVA diesel generators for sale, ideal for businesses or industrial use. Need more robust solutions?
Socio Labs is a leading digital marketing service provider offering expert solutions in PPC, Performance Marketing, Google Ads, and more. With a result-oriented approach, we help businesses grow online effectively. Explore our specialized eCommerce SEO services in India to boost your digital presence and drive sales.
54EC Capital Gain Bonds are government-backed investment options that allow you to save on long-term capital gains tax. If you’ve sold a property or other capital asset and made a profit, you can invest that gain in these bonds to claim tax exemption under Section 54EC of the Income Tax Act.
Patients feel supported throughout their skin treatment journey due to the clinic’s attentive follow-up process. The dermatologist ensures every concern is addressed. This commitment to patient satisfaction truly reflects the qualities of the Best Dermatologist in Bangalore. Best Dermatologist in Bangalore
Interesting post but i share you my idea about Ensure uninterrupted supply with expert domestic water mains replacement services. Trusted and professional.
Celebrate your special day with beautiful birthday decoration ideas that add color and joy to every party. Explore trendy balloon decorations, customized themes, elegant backdrops, and creative décor for home, restaurants, or event venues. Get inspired to create a birthday celebration your guests will always remember.
Post a Comment